Using the MaxAssist® Short Notice Lists
Filling a short notice opening can be a nightmare! Calling patient after patient takes up valuable time and you may still end up with an empty chair. Let MaxAssist® take the pain out of the process by using our powerful Short Notice List tool. Our Short Notice Lists allow you to quickly send a text and email blast to patients that have indicated to you that they are interested in just the kind of opening you are trying to fill!
Adding Patients to the Short Notice Lists:
Building your Short Notice Lists is easy. When a patient expresses that they are open to coming in on short notice, simply bring them up in the MaxAssist® Toolbar and click on the Patient Short Notice icon under their name:
Next, click on the Add to Short Notice List button to open the Create Short Notice dialog box:

Now, you can customize the short notice entry to the patient’s exact preferences. Start by indicating the type of the appointment the patient requires and select a priority for the entry:

Next, enter the patient’s availability. If your patient isn’t picky, you can select the check box that says All Week. Most patients will have some preference though, so you have the ability to add very customized availability as well. You can select the days of the week that work best for your patient, use the quick pick to select a time frame for a given day, or click on the Set Times button to get even more options:

Need to get more specific for a patient? We have you covered! Select the Additional Range check box to bring up a second time selection for each day:

You can further customize the short notice entry by setting an availability period, a preferred provider, and number of units required for the appointment:

Lastly, you have the option to add any notes pertaining to the short notice entry:

Once you are finished customizing and submitting the entry, your patient will be placed on the appropriate Short Notice List in the Toolbar. The entry will be visible on the patient’s profile under the Patient Short Notice icon, where you have quick access to editing or deleting the entry:

Filling the opening:
The Short Notice Lists are located under the Short Notice List icon on the MaxAssist® Toolbar:

Here’s where the magic happens. Let’s say it’s about 10:00am on a Tuesday morning and a hygiene patient for 2:00pm this afternoon has just called you to cancel. You have 4 very short hours to try and fill that opening! Don’t fret. Within a few clicks you’ll have notified multiple patients of the opening.
Since it’s a hygiene opening you need to fill, select the Short Notice Hygiene List.
When you first click into the list you’ll see every patient that has been added to that list. But not every patient is going to be available for a Tuesday afternoon opening, so you’ll need to start by Filtering the list:

The only selections you must make in the Filter are the date and time of the opening:

If you’d like, you can also filter by length of appointment and preferred provider. (The final option, Show ONLY COVID Missed/Cancelled, pertains to the check box in the Create Short Notice dialog box. This was implemented to assist clinics in prioritizing patients who had their appointments cancelled due to COVID-19 mandatory closures):

Once you are finished entering the Filter parameters, click on the save button and the list will refresh to show you only those patients that meet the parameters selected in the Filter:

You may want to start with any patient that has a caution sign instead of a checkbox next to their name. Those patients don’t have a cellular number or email address on file, and our system isn’t going to be able to send that patient any messages. So, you’ll want to give those patients a call. You may also want to prioritize any patients who are marked as needing to come in urgently:

Once you are ready to send a message blast you can either use the All checkbox at the top of the list to auto select all of the patients in the list with either a cell and/or email address on file, or you can select individual patients:

Now that you have selected the patients you wish to notify, the last step will be to hit the Send Message button. Before the message actually goes out, you’ll have the opportunity to double check the date and time of the appointment and add any additional verbiage you might want the patients to see:
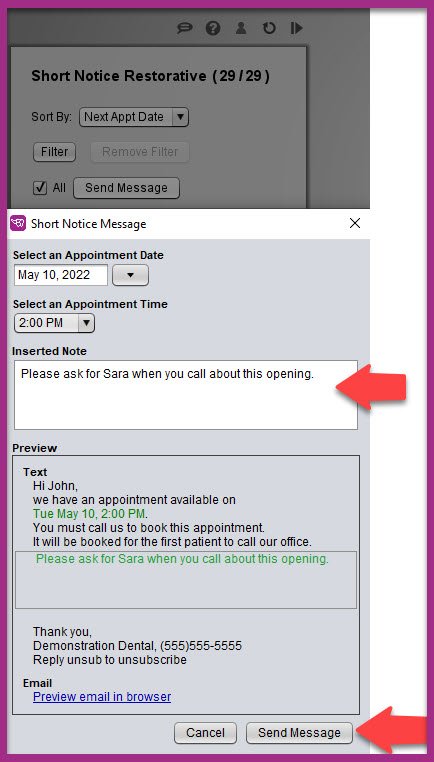
Send the message blast and wait for the telephone to ring! If more than one patient calls back don’t worry! The message that is sent is worded so that patients know the appointment will be given to the first person to call about the opening.
For more information on this or any of our features, please reach out to us.
Phone: 1-800-651-8603 ext 1,
email: support@getmaxassist.com
Live text chat at www.getmaxassist.com
Thanks for using MaxAssist®!